-100%


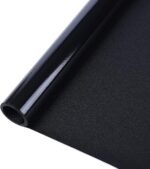


rabbitgoo Blackout Window Film, Sun Heat Blocking Privacy Cover for Glass, Removable Opaque Room Darkening Dark Black Out Window Covers Tint Shades for Home Day Sleep Light Blocker 23.6 x 78.7 Inches
Original price was: $26.99.$0.01Current price is: $0.01.


Amazon User –
a night shift must have!
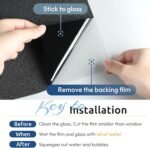
This stuff keeps all that nasty sunlight out of my bedroom! I did go back and tape over the edges later but as a night shift worker, you gotta do what you gotta do! It fully blocks the sunlight everywhere I’ve put it! The only sunlight leaking into my room is where I cut it badly because it was a bit difficult to install.That aside, trust me, curtains aren’t enough, even specifically black out curtains aren’t enough! This stuff does some heavy lifting and works GREAT! Even without curtains, but curtains help still. I’m also a renter so I like knowing it’s fully removable without a trace! I did tape the edges with painters tape to cover my bad cuts though, wish it was easier to install but honestly just get some help from someone who knows what they’re doing.
Love shopping –
DIY saves money
I was a little nervous about installing this by myself and concerned if it would look ok. I prepared by watching a few YouTube videos. By time the film arrived I was ready. I pre-measured, used lots of soapy water and was determined it would work. And it did! I got the film installed on two windows in about 35 minutes. Honestly I found the installation very straightforward. I believe the quality of the film was very helpful during handing.I don’t understand the negative reviews. Look at a video on how to install if you feel nervous and get it done. The film definitely helps block the uv rays
Joyce E. Bryan –
Good opaque window covering
I covered the lower portion of my windows to keep my dogs from jumping up and barking at everything outside that moves. This was fairly easy to use. First clean your window well. Then, using a spray bottle of water, liberally wet the window. Peel the transparent back off of this and apply. It recommends using a squeegee to get the air bubbles out, but I found it worked better to simply smooth them out with my hand. This isn’t a 5 star rating because I found it nearly impossible to get all the air bubbles out. it was also difficult to separate the opaque material from the transparent backing that came on it. It recommended putting a piece of tape on each side of one corner and quickly pulling it apart, and this helped tremendously.
jinx342 –
Easy, Beautiful Kitchen Cabinet “Upgrade”
Originally I was going to call our glass company and order new frosted glass panes for our cabinets until my husband suggested this alternative.We bought the “frosted glass” privacy film – it worked out great and our cabinets look so much nicer now.Before installing, I read through a few reviews. One mentioned placing the textured side down against the glass, but that’s actually incorrect.The directions aren’t crystal clear at the start, but under the “Tips” section you’ll see that there’s a clear backing film that must be peeled off before applying.Once removed, spray the glass generously with water (plain or with a drop of dish soap for slip) and position the film. Use a flat edge (like a credit card or putty knife) to smooth it out and push out air bubbles. It’s very straightforward once you know this step.The most important prep is making sure your glass is absolutely clean before you begin.I also saw a review that mentioned needing tape to hold the film in place on kitchen cabinets, but in our experience that wasn’t necessary. We haven’t had any issues with adhesion, corners lifting, or peeling – it’s stayed put perfectly.The attached photo shows one cabinet pane covered and one uncovered. We really love the softer, frosted look. While it doesn’t completely block out the contents of the cabinets, it does blur them enough to give a much cleaner, more polished appearance. Overall, we’re very happy with the results and the savings.
#AskMissPatience –
Comes off despite effort
Update less than 12 hours after application to one window according to directions … 1/3 of product is no longer stuck to the window. Resulting in removing two stars. Less I can figure out another way to get the product to stick since following the directions hasn’t worked 100%.Wondering if it’s due to having an older 1900’s house. I’m going to try with the replacement windows.Had SO much hope in the product concept. Wish I had a five star experience as other users have!———While searching for potential products to obscure views besides frosted paint I searched products such as this.Sometimes I add stuff to my cart. Then, either save for later, stash on a list, delete, or order. Having decided to make space to do the project.Welp, ooopppps! Accidentally pushed the wrong button. Wouldn’t allow me to cancel. Soooo, a couple days later ‘Viola’ two rolls show up. Was gonna wait due to finding out I’d be getting new windows the day I was shopping for something to help with a few windows. Decided there’s ample opportunities to use this is why I kept it.Anyhow, today, upon hanging one panel in a window am posting a review. Pros, Cons, and why the star count.Loss of stars for messy installment necessity. Tips and edges don’t easily remain stuck. Sparse instructions. Support of other reviewers who relate to the struggle with the product and no way to fix it. This review is in your honor and to assist future users.Pros: Obviously, obscures viewing while allowing light into the space desired. Ability to cover multiple standard window sizes. Price comprarable or slightly better than big box stores.Cons: instructions are void details. Instructions with multiple languages is helpful to confusing a lot of nations. If you’re not savvy about the nuances you’ll deal with attempting to install this product you’re gonna get pissed, frustrated, and offer a crappy review if you even bother. Already feeling as though this product has robbed you of your valuable hard earned money, time, and sanity.TIPS: to assist IF the seller adds details to the few current steps. To buyers whom desire the benefit of this product for the ease of receipt from amazon.Recommendations: although most people don’t having Dr Bonner’s soap. My chosen brand for this project. Dawn dish soap would be a better choice. It’s sticker. I’m using it on further installation on other windows.Have a plastic putty knive. It’ll give the best spread. Also, having a 10 inch really does the trick. While spreading the soapy water inside. Having the handle makes for a nice even smooth push, spread, even wider movement then a credit card which frankly is a pain in the butt for the width of this installation. Wider edge = happy user.Have a flat surface to lay the precut product on. Spread the soapy water on the product. Rather than the window. Use a modest amount. You’re gonna need it. Make sure to apply to the textured side.Have paper or regular towel spread along the bottom of the windows. Have extra ready to clean up the mess you will make. A wash cloth works great for this part.Having a clean dry rag to use over the application once you’ve applied, used putty knife, and wipe up the corners will help gently continue to apply pressure to the product.You may, depending on your windows, have edges of the film that simply won’t stay down. I’d suggest, when everything’s dries, adding a little water to some Elmer’s and rub it on the edge with your finger. Then, use the putty knife to push from inside toward out. Use your finger, the clean one, and have a wet rag to wipe your finger of the glue. Plus, you’ll wanna clean away any spill over on the window. Or, it’ll leave that Matt Elmer film.Now, about the putty knife motion. When you apply the product you’ll see lots of inconsistencies between it and the window. Here’s a method for even spreading of the stuff on the product between the window***Oh yeah, special note, reminder again, use the bumpy side on the product toward the window. Not the slick side.***While holding the product in place, at the top, start in the middle. Lay the putty knife on the product. Push toward the window edge side down. Then up. The product will move if you need to realign it slightly. Then, putty knife middle to other side.Continue this until you’ve oozed the soap and water out. As though your squeeging water off your windshield. Basically move from middle to edge. Ensure edges still line up. Keep moving soap and water out of the sides. This will also help seal the product to the window.If you did a great job precleaning the window, the now cloud cover should be spotless. If not, quickly peel away. Remove the hair or debris that may be trapped. I’d recommend res-soaping and redoing the process to ensure sticking. By now you’re a pro so no fear you’re screwing up! Just do it!If you have older windows, like me, that haven’t been replaced yet. Razor blade any paint around the edges. Prior to install. If there’s ANY debris, paint, dirt this product won’t stick. Then, use the Elmer’s trick. If you forgot, or don’t care about how you get the edge to stick.I’m not certain how this product holds up in all weather. If it falls off or becomes a problem I’ll update.Four stars ease of use. As far as it obscures the view from people outside.Currently four stars for durability to to edges coming off window refusing to install. Requiring some other means of application. If not updated within the four seasons from now, July 2018 and next year, July 2019 you know it’s working okay for how I need it to.One star for ease of install. Honestly, worst product install due to the instructions I’ve ever had. Given I’ve got decades of tooling and DIY experience this says something.The everyday shopper should have a simple ease of installation. Currently, this is limited. It’s a very helpful product overall for what it’s meant for. No reason we shouldn’t have 4 and 5 stars across the board with a few updates on how to anyone can understand.Sincerely hope this inspires others to make this work for you!
SammattaYou –
I don’t write a ton of reviews but I am impressed with this product. As the title says, I was expecting this to be a bit of a hassle to install (which is why I put it off for a while). After measuring, cutting and installing the first one, I did all the rest of my windows fairly quickly.The privacy factor is great, ample sunlight comes through and no more messy, dusty sheer curtains.The fact that you only need water and science to stick this on is fantastic. You can make slight adjustments after putting it on, etc. Cutting off the excess edges was simple, too (helps if you have a square ruler).That said, I just installed them so I’m hoping they hold up over weeks, months and years, winter/summer, etc. We’ll see.Overall, I was dreading this a bit, thinking it would be like trying to get the bubbles out of those mobile phone screen protectors, but nope! As long as you have the tools they suggest, this should be no problem. Plus, it won’t leave any residue if you choose to remove them later on. Nice!
Interesting story but so many holes in the various pots. My book club agreed it was well written but skipped important information about characters and events, which made it feel unfinished. It was easy to read but otherwise kind of meh overall. –
Love this product!It was super easy to apply, looked great, and worked a treat in keeping the heat out and privacy from neighbours. I bought two more it was so good!
Louis Chagnolleau –
Fais très bien son travail facile a poser, il est très bien occultant
Maria Ortega –
Me encantó todo de este producto, vivo en un primer piso con vista al exterior, buscaba algo que me diera privacidad pero que al mismo tiempo fuera “rent-friendly”.La aplicación es súper sencilla, y la mica se siente de excelente calidad; no viene con accesorios para aplicarlo, pero aquí mismo en amazon compré un kit de spray, tarjeta antiburbujas y cortador… Me facilitó la vida muchísimo. A pesar que mi ventana tenía imperfecciones (manchas de pintura, gotas de silicon) no tuve problemas para que se adhiriera y tampoco quedaron burbujas; ha pasado casi 1 año y no se ha despegado para nada.Conseguí la privacidad que necesitaba, a pesar que aún es un poco traslúcida , en el día me protege de la vista desde afuera.También noté que retiene un poco del calor por el sol, pero no sacrifica la entrada de luz exterior. Lo recomiendo 100%
Zeinab H. –
Die Fensterfolie von rabbitgoo ist wirklich top! Ich war überrascht, wie einfach die Anbringung war – Fenster reinigen, Folie zuschneiden, mit Wasser aufsprühen und glattstreichen, fertig. Kein Kleber, keine Blasen, und sie hält trotzdem perfekt.Das Muster sieht elegant aus und lässt genug Licht durch, während man von außen absolut nichts erkennt – ideal für Badezimmer, Schlafzimmer oder Erdgeschossfenster. Besonders gut gefällt mir, dass man sie jederzeit wieder abziehen und neu positionieren kann, ohne Rückstände zu hinterlassen.Fazit: Tolle Qualität, modernes Design und perfekter Sichtschutz – klare Kaufempfehlung!